
To get to your profile, log in, then click “My Account” in the upper right corner, and choose “Profile” from the drop-down.
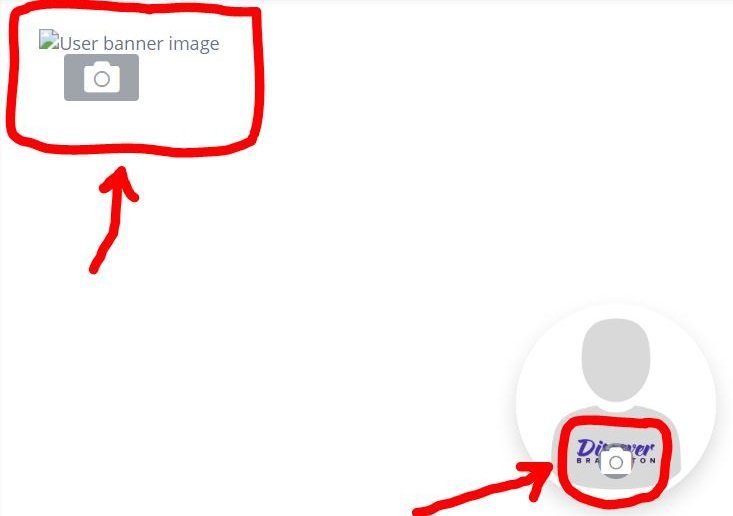
To personalize your profile, add a photo and banner image by clicking on the camera icon in the gray circle and in the top left corner. Once the photo is uploaded, make sure you adjust the cropping so it appears the way you want.
Note that you profile will be visible from your public business listing. For this reason, you may want to create a business profile and a separate personal profile.
To set up a second profile, log out of the system, then click the “Register” button in the top right corner.
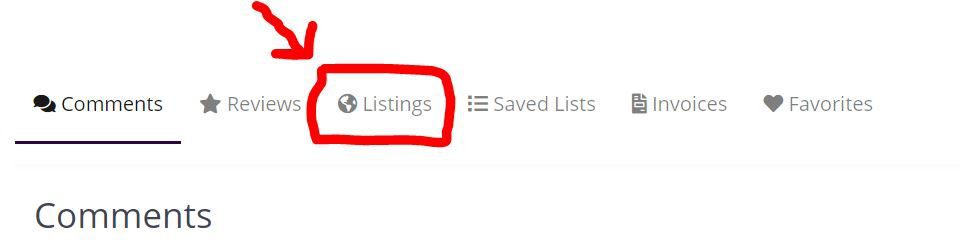
From your profile, you can easily track all of your activity in the system, including:
- Comments – any comments you’ve made on Discover Bradenton blog posts
- Reviews – any reviews you’ve left for other businesses or events
- Listings – all of the business listings you manage
- Saved Lists – any lists you’ve created
- Invoices – copies of your invoices. Note these are set up to bill you automatically. You can also choose to “pay now” and print copies for your records.

You can access your business and event listings from your profile by clicking on the “listings’ tab.
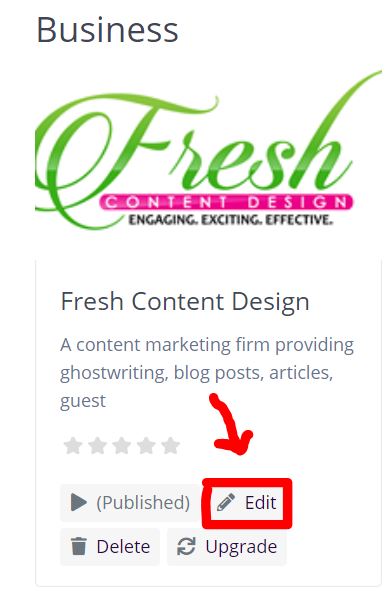
To view your listing as it is right now, click on the business name or the event name.
To make edits go to Profile / Listings then click on “Edit” under the business or event you want to change. Make any necessary updates and then click “Submit Listing.”
If your changes aren’t coming up when you preview, try clicking submit, then previewing again. (see screenshot below)
Before making changes, please read through the following details. (Note that you may not see all the options below, depending on your package).
Package – Please do not change your package unless you’re trying to upgrade as you will be prompted to pay once you click the “Submit” button.
If you wish to downgrade your package, please contact us with your request and we will take care of it for you. This will help you avoid any potential problems with your listing or your billing.
Franchise – if your business has more than one location, you can add a franchise to any package for an additional $15 per month. To do this, click “Yes” under the “Has Franchise?” option.
“Lock Franchise Fields” allows you to add the fields that you want to be consistent in each of your franchise listings (ex. category, tags, website).
Note that when you click “Submit” you will be directed to the payment tab. Once your payment is processed, you’ll go back to your profile where you’ll see the franchise listed and can make edits.
Business Description – use this space to provide a detailed business description. Note that free listings are limited to 280 characters.
Tags – these are short search terms that can help users find your business. For example, a restaurant may use “Brunch, Happy Hour, Outdoor Dining.” Separate each tag with a comma.
Category – you must choose at least one primary category (ex. Real Estate, Restaurants & Nightlife). Paid members may choose multiple categories. However, Discover Bradenton will make the final decision regarding the most appropriate categories for your business. This help keep the directory organized and creates a better user experience.
Address – the system requires you to add an address. If your business has a physical location, add the address, then check that the bubble on the map falls in the right place. If not, you can drag and drop the location bubble.
If you work from home or don’t have a physical address, you may enter the default address of “101 Old Main St. Bradenton, FL 34205” (this is the city center). Note that this address will not show up in your listing, but the location bubble will show up on the map. Simply move the bubble to your general service area or leave it where it is.
Neighborhood – this is another way that users can browse for business listings. Please choose the appropriate neighborhood from the drop-down menu or leave it blank if none of the options apply.
Images – upload images to create an image gallery. Note that the first image shown will appear as the large “featured image” at the top of the listing. You can rearrange the order of your images by dragging and dropping them.
Although you may use your logo as your featured image, we highly recommend using a high-quality photo as this will look much better in the search results. If you don’t have any appropriate photos, you can find quality stock images that are available for free public use at sites like Pexels and Pixabay.
If you’re having trouble making your image fit, we recommend using a program like Canva to create an appropriately-sized image. Generally, an image that is 1600 x 500 pixels will work, but you may need to experiment to create the look you want.
Social Media – adding your social media links will make it easy for users to find and follow you right from your listing. When entering your information, please be sure to enter the entire URL (ex. https://Facebook.com/YourBusiness) and not just your user name (ex. @yourbusiness).
Videos – if you would like to upload a video, please enter the URL. You can get this by finding the video on YouTube or Vimeo and clicking the “Share” button, then copy/paste into the “video” section your listing. (Available for Gold and Platinum packages only)
Special Offers – we recommend adding a special offer or discount to your listing (ex. “Mention Discover Bradenton and get 10% off your order). To do this, simply type the details of the offer. This will show within your listing and your business will also show up on the “Discover Local Deals and Discounts” page.
Book an Appointment – if you use an appointment-setting service like Calendly or Appointy, simply add your URL here and it will come through on your listing. (Only available in Gold and Platinum packages)
Adding events is super easy. Simply head over to your profile and click “Add a Local Event” on the right-hand sidebar.
Note – you must be logged in before you can add an event!
If your event is already listed on Facebook, enter the URL and click “Import Details.” It’s important to remember that Facebook doesn’t always play nicely with other systems, so make sure you double-check all of the information that has been pulled in.
Add any additional information you want to include in your event listing.
Note that you can drag and drop your uploaded images to create a gallery. The first image shown will be the large featured image displayed at the top of your event.
Once you’ve previewed the listing and are happy with it, check the box to agree to our terms and conditions, then click “Submit Listing.”
Your event will be forwarded to us to review and approve. If we notice any issues, we will contact you. Otherwise, you’ll receive an email notification once your event goes live. Please give us 48-hours to complete this review. If you don’t receive a response by then, contact us online or send a text message to 941-705-4808.
If you ever have a question or problem with your billing, please don’t hesitate to contact us.
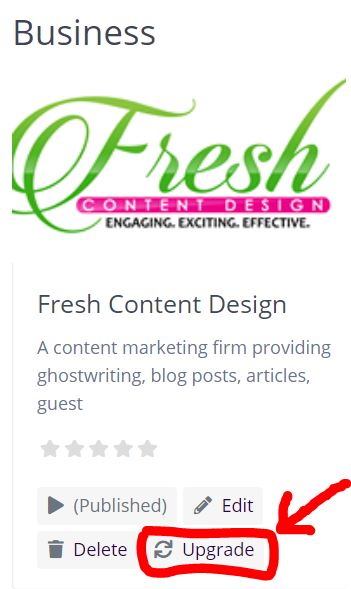
Upgrading Your Listing
If you decide you want to upgrade to a more robust membership option, simply find your listing by going to “My Account” then “Profile” and “Listings. Then, click the “Upgrade” button.
Select your new package and wait a moment for the screen to refresh. Then, complete any new fields that pop up and click “Submit.” You will be redirected to the payment page. Once your payment is completed, your listing will be updated.
Changing Your Payment Information
We never store credit card information on our site for security reasons.
You can update your billing details via a secure link. To do so, simply contact us. You will then receive an email from our payment processor with your secure link.
Downgrading or Canceling
If you wish to downgrade or cancel your membership, please contact us and we will take care of it for you.
We hate to see you go, but there are also a few important things you need to know:
- Cancellation requests may only be placed by using our contact form or using the cancelation form found in the footer of our website. Facebook messages are not always monitored, so please make sure your request is sent via the appropriate channel so we can get back to you in a timely fashion.
- It’s important that you request your cancellation at least 48 business hours before your billing cycle ends. Automatic renewals will not be refunded if the cancellation request is not placed within this timeframe.
- We increase our membership pricing periodically. Once you cancel your account, your pricing plan is forfeited permanently. However, you are more than welcome to re-join the membership in the future at the regular rate (which may be higher).
- Once your cancellation request is placed, your account will immediately be downgraded to the free membership option and all of your premium details will be lost.
Once you become a member or create a free listing, you’ll have access to Discover Bradenton’s private Facebook group. Here you can connect with other business owners, ask for feedback, and help each other grow.
The group hosts weekly threads to help grow your social media, improve your rankings, and promote your business. It’s also the best place for you to keep up with upcoming promotional opportunities, exclusive discounts, and more!
To join the group, visit https://www.facebook.com/groups/DiscoverBradenton. Make sure you complete the questions so we can approve you as quickly as possible!
Discover Bradenton occasionally hosts contests and giveaways. Paid members have the opportunity to gain extra exposure by becoming a sponsor. When these opportunities become available, you’ll be notified through our email newsletter and/or private Facebook group.
If you have an idea for a contest or giveaway, feel free to contact us!
You might find what you need over on our general FAQ page!
Still have questions? We’re happy to help! Contact us for more information.